「Docker」を触ってみた

【Windows環境でDockerを試走】
Dockerがサクサク動くと聞いたので実際試してみる。
- 試した環境
Windows10
CPU:2.90GHz 4core
Memory:16GB - 使用したツール
Docker for Windows - チェックポイントとゴール
- Dockerインストールと起動確認
- イメージ(CentOS)のロードと起動確
- Dockerfile(構成情報の定義)の作成と実行
イメージ:CentOS
内容:apache(httpd)インストール
tomcatインストール
webアプリケーションのデプロイ
デプロイしたアプリケーションの実行確認まで
※インストール方法等は既に色々書かれたページがある為、つまずいた箇所をメインに記載。
作業
①Dockerインストールと起動確認
- インストーラーのダウンロード
※DockerIDが必要な為、IDを作成 - インストーラ実行
※完了後、sign out(?)と合ったから、dockerのsign outと思ったら、マシン再起動だった・・・ - マシン再起動
Hyper-Vを有効にしろと色々書かれていたので無効のまま、インストールしたら以下の画面が表示された
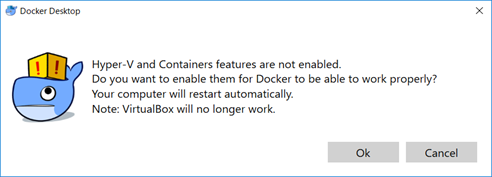
OKを選択してHyperVを有効化する。(マシン再起動された)
※HyperVを有効にするとVirtualBoxが起動できなくなる為、VirtualBoxを使っている場合は注意が必要。(現状共存はできない模様)
- 起動確認
docker run hello-world
⇒失敗
docker pull hello-world
してから再度実行して正常実行を確認。
Hello from Docker!
This message shows that your installation appears to be working correctly.

To generate this message, Docker took the following steps:
 1. The Docker client contacted the Docker daemon.
 2. The Docker daemon pulled the "hello-world" image from the Docker Hub.
    (amd64)
 3. The Docker daemon created a new container from that image which runs the
    executable that produces the output you are currently reading.
 4. The Docker daemon streamed that output to the Docker client, which sent it
    to your terminal.

To try something more ambitious, you can run an Ubuntu container with:
 $ docker run -it ubuntu bash

Share images, automate workflows, and more with a free Docker ID:
 https://hub.docker.com/

For more examples and ideas, visit:
 https://docs.docker.com/get-started/
②イメージ(CentOS)のロードと起動確認
- CentOSのイメージ取得
C:\tmp\docker\centos>docker pull centos
Using default tag: latest
latest: Pulling from library/centos
a02a4930cb5d: Pull complete
Digest: sha256:184e5f35598e333bfa7de10d8fb1cebb5ee4df5bc0f970bf2b1e7c7345136426
Status: Downloaded newer image for centos:latest
- コンテナを実行
C:\tmp\docker\centos>docker run -it centos
[root@3f4b46a6babf /]#
- CentOS上でバージョン確認
[root@3f4b46a6babf /]# cat /etc/redhat-release
CentOS Linux release 7.6.1810 (Core)
③Dockerfile(構成情報の定義)の作成と実行
- 以下の内容でDockerfileを作成。
# どのイメージを基にするか
FROM centos

# httpd, java, tomcat, webapps(サンプル)のインストール
# & httpd, tomcatの自動起動を設定

RUN yum install -y httpd java-openjdk tomcat tomcat-webapps && \
    yum clean all && \
    systemctl enable httpd.service && \
    systemctl enable tomcat

# tomcatとapacheのポート開放
EXPOSE 80
EXPOSE 8080

CMD ["/sbin/init"]
httpdとtomcatの起動でずいぶん悩まされたが、最終的に上記の設定に落ち着いた。(自動起動設定をON)
systemctl start xxxを実行しようとすると、もろもろの壁にぶち当たりうまく設定できず。。。
(CMDは1個だけとか、systemctlを使用する為の壁とか
※webアプリは適当な物を作ろうと思ったが断念。動作確認用にtomcat-webappsを使用
- 以下のコマンドでBuild
docker build -t sample .
※sampleはイメージ名(自由に指定)
Successfully built d46dd3efefde
Successfully tagged sample:latest
SECURITY WARNING: You are building a Docker image from Windows against a non-Windows Docker host. All files and directories added to build context will have '-rwxr-xr-x' permissions. It is recommended to double check and reset permissions for sensitive files and directories.
Warningについては今回は未調査
- 以下のコマンドでコンテナの実行
docker run -d –privileged –name sample -p 8080:8080 sample
–name の指定はコンテナ名(自由に指定)後で停止、削除時に使えるので指定した
-p はポートフォワードの設定
–privileged は特権モードの指定(詳細は未調査)。正しくは別の方法で権限を検討すべきの模様
C:\tmp\docker\centos>docker run -d --privileged --name sample -p 8080:8080 sample
c195107840332490fac203c989fc335bca512bf7d53338d60df0d1586381f6c5
- 以下のコマンドでコンテナに接続
docker exec -it sample /bin/bash
(sampleはコンテナ名)
[root@c19510784033 /]# ps -ef | grep httpd
root        50     1  0 10:29 ?        00:00:00 /usr/sbin/httpd -DFOREGROUND
apache     166    50  0 10:29 ?        00:00:00 /usr/sbin/httpd -DFOREGROUND
apache     167    50  0 10:29 ?        00:00:00 /usr/sbin/httpd -DFOREGROUND
apache     168    50  0 10:29 ?        00:00:00 /usr/sbin/httpd -DFOREGROUND
apache     169    50  0 10:29 ?        00:00:00 /usr/sbin/httpd -DFOREGROUND
apache     170    50  0 10:29 ?        00:00:00 /usr/sbin/httpd -DFOREGROUND
root      1931  1916  0 10:52 pts/0    00:00:00 grep --color=auto httpd
[root@c19510784033 /]# ps -ef | grep tomcat
tomcat      47     1  0 10:29 ?        00:00:05 /usr/lib/jvm/jre/bin/java -classpath /usr/share/tomcat/bin/bootstrap.jar:/usr/share/tomcat/bin/tomcat-juli.jar:/usr/share/java/commons-daemon.jar -Dcatalina.base=/usr/share/tomcat -Dcatalina.home=/usr/share/tomcat -Djava.endorsed.dirs= -Djava.io.tmpdir=/var/cache/tomcat/temp -Djava.util.logging.config.file=/usr/share/tomcat/conf/logging.properties -Djava.util.logging.manager=org.apache.juli.ClassLoaderLogManager org.apache.catalina.startup.Bootstrap start
root      1933  1916  0 10:52 pts/0    00:00:00 grep --color=auto tomcat
[root@c19510784033 /]#
(httpd、tomcatが起動できているか確認)
- hostマシンでlocalhost:8080に接続
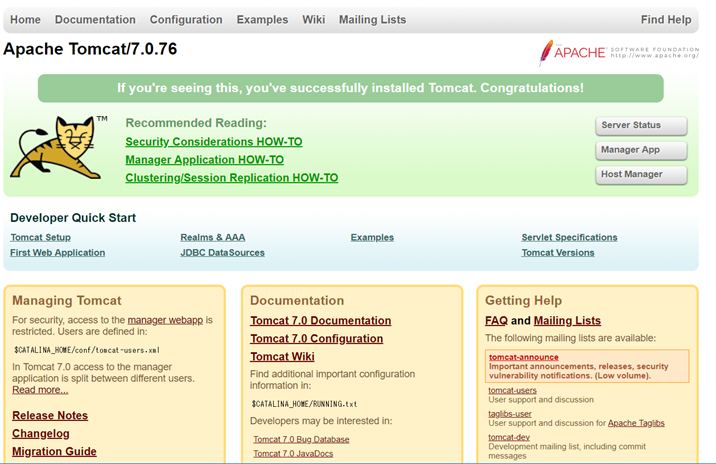
表示できている事を確認
感想
dockerfileで環境構築できるので、いろいろなパターンファイルを作成して用意しておけるのは助かりそう。
ここで書いた内容の操作については時間もかからなかった為、かなり快適。(docker stopは若干もたつく感があった)
次回以降の課題
ここで書いた・実施した内容はgoogle先生に聞けばできる内容なので、次は少しでも踏み込んだ内容にしたい。
せめてtomcat・apache連携位は入れたかった。。。