Spring boot 小ネタ

こんにちわ、猫好きリーマンのほげPGです。
今回は 以下の小ネタを紹介します。
・別名の設定ファイルを読み込ませる
・設定値一覧を表示する
・velocityをテンプレートエンジンで使う
・thymeleafをViewとは別のテンプレートエンジンでも使う
・DataSource名がぶつかるのを回避する設定
・Tomcat起動バッチ
1、別名の設定ファイルを読み込ませる
環境変数 spring.config.name に application,env と指定すれば、application.properties(yml)以外にenv.properties(yml) も読み込んでくれます。
WebApp.java
@EnableAutoConfiguration
@ComponentScan()
@Slf4j
public class WebApp extends SpringBootServletInitializer {

    @Override
    protected SpringApplicationBuilder configure(SpringApplicationBuilder application) {
        log.info("called.");
        return application.sources(WebApp.class)
                .properties("spring.config.name=application,env");
    }

    public static void main(String[] args) throws ClassNotFoundException {
        log.info("called. {}", Arrays.deepToString(args));
        new SpringApplicationBuilder(WebApp.class)
                .properties("spring.config.name=application,env")
                .run(args);
    }
}
※tomcatでも動くようにしてみました。同じコードなのがいまいちなのですが、わざわざstaticメソッドを作るのもいやなので妥協しました。
実際にenv.ymlに以下を定義して実行すると、読み込まれたのが確認出来ます。
env: local
HogeConfig.java
@Configuration
@Slf4j
public class HogeConfig {
    @Value("${env}")
    String env;
    @PostConstruct
    public void init() {
        log.info("env: {}", env);
    }
}
2、設定値一覧を表示する
StandardEnvironmentから気合で取れました。
@Configuration
@Slf4j
public class HogeConfig {
    @Autowired
    StandardEnvironment environment;
    @PostConstruct
    public void init() {
        MutablePropertySources sources = environment.getPropertySources();
        for (PropertySource<?> p : sources) {
            String name = p.getName();
            Object source = p.getSource();
            if (source instanceof Map) {
                Map<?, ?> map = (Map<?, ?>) source;
                log.debug("{}: {}, {}", name, source.getClass(), map.size());
                for (Map.Entry<?, ?> entry : map.entrySet()) {
                    log.debug("  {}: {}", entry.getKey(), entry.getValue());
                }
            } else {
                log.debug("{}: {}", name, source.getClass());
            }
        }
    }
}
※actuatorを使えば簡単に確認できます。
Pom.xml に以下を指定
        <dependency>
            <groupId>org.springframework.boot</groupId>
            <artifactId>spring-boot-starter-actuator</artifactId>
        </dependency>
application.yml に以下を設定
management.endpoints.web.exposure.include: "*"
webアプリを起動したら、以下のURL(上:設定、下:bean)をpostmanやcurlで呼出、jsonを整形。
http://localhost:8080/hoge/actuator/env
http://localhost:8080/hoge/actuator/beans
3、velocityをテンプレートエンジンで使う
Spring boot 2 だと自動で設定してくれないので自前で設定する必要があります。
Pom.xml
		<dependency>
		    <groupId>org.apache.velocity</groupId>
		    <artifactId>velocity</artifactId>
		    <version>1.7</version>
		</dependency>
application.yml
mail.velocity:
  resource.loader: class
  class.resource.loader.class: org.apache.velocity.runtime.resource.loader.ClasspathResourceLoader
  input.encoding: UTF-8
  output.encoding: UTF-8
※prefixやsuffixを設定する機能はClasspathResourceLoaderには用意されていません。
HogeConfig.java
@Configuration
@Slf4j
public class HogeConfig {
    @Bean("velocityProperties")
    @ConfigurationProperties(prefix = "mail.velocity")
    public Properties velocityProperties() {
        return new Properties();
    }
    @Bean
    public VelocityEngine velocityEngine(@Qualifier("velocityProperties") Properties props) {
        log.debug("props: {}", props);
        VelocityEngine velocityEngine = new VelocityEngine(props);
        velocityEngine.init();
        return velocityEngine;
    }
}
テンプレート src/main/resources/mail/hoge.vm
ほげ(velocity):$now
使用サンプル
    @Autowired
    VelocityEngine velocityEngine;
    public String hoge2(…) throws IOException {
        …
        StringWriter writer = new StringWriter();
        VelocityContext ctx = new VelocityContext();
        ctx.put("now", new Date());
        Template template = velocityEngine.getTemplate("mail/hoge.vm");
        template.merge(ctx, writer);
        String body = writer.toString();
        log.debug("body: {}", body);
        …
    }
実行結果
2019-12-23 15:43:21 DEBUG xec-1 (HogeController.java:53) hoge2 - body: ほげ(velocity):Mon Dec 23 15:43:21 JST 2019
4、thymeleafをViewとは別のテンプレートエンジンでも使う
Webのviewerでも使いたいので、TemplateEngineはnewせず、TemplateResolverをいい感じに生成するだけになります。
application.yml
mail.thymeleaf:
  prefix: /mail/
  suffix: .txt
  templateMode: TEXT
  characterEncoding: utf-8
  cacheable:: false
  order: 1
  check-existence: true
※重要なのはorderでリゾルバの順序を指定するのとcheck-existenceをtrueにしてテンプレートが見つからなかった場合に例外にしないことです
HogeConfig.java
@Configuration
@Slf4j
public class HogeConfig {
    @Bean("thymeleaf-resolver")
    @ConfigurationProperties(prefix = "mail.thymeleaf")
    public ClassLoaderTemplateResolver mailThymeleafResolver() {
        ClassLoaderTemplateResolver templateResolver = new ClassLoaderTemplateResolver();
        return templateResolver;
    }
}
テンプレート src/main/resources/mail/hoge-body.txt
ほげ(thymeleaf):[[${now}]]
使用サンプル
    @Autowired
    TemplateEngine mailTemplateEngine;
    public String hoge3(…) throws IOException {
        …
        Context ctx = new Context(Locale.JAPANESE);
        ctx.setVariable("now", new Date());
        String body = mailTemplateEngine.process("hoge-body", ctx);
        log.debug("body: {}", body);
        …
    }
実行結果
2019-12-23 15:55:53 DEBUG xec-1 (HogeController.java:70) hoge3 - body: ほげ(thymeleaf):Mon Dec 23 15:55:52 JST 2019
WebView が機能することも確認。
ブラウザからほげる
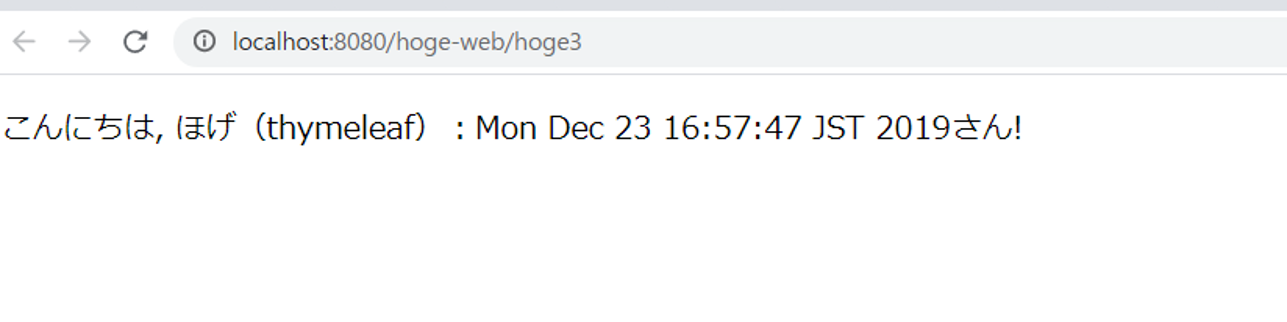
ログ
2019-12-23 16:57:47 DEBUG xec-1 (HogeController.java:65) hoge3 - called.
2019-12-23 16:57:48 DEBUG xec-1 (HogeController.java:70) hoge3 - body: ほげ(thymeleaf):Mon Dec 23 16:57:47 JST 2019
5、DataSource名がぶつかるのを回避する設定
DataSourceをデフォルト設定で使っているWebアプリが2つ以上動作しようとすると、起動時に以下の例外が出ます。
Unable to register MBean [HikariDataSource (null)] with key ‘dataSource’; nested exception is javax.management.InstanceAlreadyExistsException: com.zaxxer.hikari:name=dataSource,type=HikariDataSource
これを回避する設定は以下となります。
spring.jmx.default-domain: hoge-web
※hoge-webは自分自身のアプリ名など
6、Tomcat起動バッチ
環境変数設定やサービス設定をしたくないので、以下のバッチをTomcatフォルダに置いて起動させています。なんとなく紹介します。
TOMCAT_START.bat
set CATALINA_HOME=.
set JAVA_HOME=C:\java\pleiades-2019-06\java\8
set path=%path%;%JAVA_HOME%\bin
bin\startup.bat
プロジェクト一式
今回はここまで。